
What are the different types of baseboard?
For many, the first experience of assembling a ‘TT’ train track is when one is set out on the floor or carpet (not recommended) during the first flush of excitement. Maybe the Hornby TT:120 train set has been given as a Christmas or birthday present, or quite possibly as an anniversary or retirement gift. On the other hand, it is more that possible that the set was purchased by the eventual user themselves as a good starting point to building their own model railway but whatever the case the track will require something a little more permanent for the trains to operate on. The following are a few options that you will hopefully find useful.
Plywood baseboard
This is possibly the simplest of baseboards that can be used. Such baseboards are suitable for smaller layouts and small enough to slip under a child’s bed. Arguably the most common sizes of baseboards are made up of sheets of plywood measuring either 6’ x 4’ or 8’ x 4’ but as this is ‘TT’ the baseboard can be much smaller as has been mentioned earlier.
The Hornby TT:120 Track Pack extended train set layout requires a board of 54” x 40” (137cms x 102cms) but an even smaller baseboard can be used and still have room for an interesting layout. Sheets of plywood can be obtained from most timber merchants or major DIY stores who no doubt will be happy to cut the sheets to size. The thickness of plywood can vary but for ease of use, it is recommended that the sheets are ½” in thickness.
To help prevent the board from warping it is recommended to screw and glue 2” x 1” battens around the whole bottom edge of the board with bracing pieces spaced across the centre every 15” or as appropriate depending on the size of the board. This framework will also provide some rigidity.
As suggested this type of baseboard can, depending on size be pushed under a bed, slid behind a wardrobe or propped up against a wall. When in use the baseboard can be placed on the floor, a suitably sized table, maybe an old table tennis table, or even on top of a bed. Folding legs can also be added at a later date or during construction but this depends greatly on the skill of the person doing the woodwork.
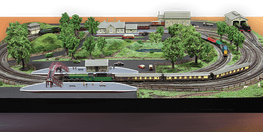
Custom-built table layout
For those who wish to have a layout permanently set up then the baseboard will require to have a more permanent structure. The thickness of the plywood can still be ½” (12mm) as previously recommended or as it is a more permanent fixture the thickness can be increased to ¾” (20mm). Obviously, this is where planning is very important as you will need to be certain where the layout is going to be positioned before you even start considering building the baseboards.
It is relatively straightforward to build a baseboard providing you have access to some basic tools including a drill, saw, screwdriver and a hammer. Care must always be taken when working with tools to wear appropriate safety goggles plus care is taken when using sharp-edged tools.
The obvious advantage of this type of table is that it can be built to your exact requirements including the size and height to suit you and the room. It also makes it easier for the plywood to be laid over the top and secured in position using screws rather than nails. Something you may like to consider is should you think you may need to move the layout and providing it is not too large would be the fitting of castors.
Do remember that if you lay two plywood sheets next to each other on the top of the table framework ensure that where the two pieces come together that there is a support piece of 2 x 1 underneath so that you can screw the sheets in place on the edge. Failure to do this may over time result in the boards separating along the join and leaving a noticeable gap or worse.
The importance of spacing out elements of your layout
The scale of Hornby TT:120 model trains is 1:120 or approximately 2.54 mm to every 12 inches The model railway track that Hornby TT:120 locomotives run on has a gauge of 12mm, this being the distance between the inside faces of the running rails. This combination of scale and gauge is commonly referred to as ‘TT:120’.
Hornby has an initial track selection of 20 elements increasing to 25 and when used correctly, these track sections will result in the creation of a model railway system to suit most users.
All Hornby curves are one of five standard radii: 1st Radius, 2nd Radius, 3rd Radius, and 4th Radius and 6th Radius. For the more technically minded the ‘radius’ dimension is measured to the centre of the running rails and with this in mind it is always recommended that you allow an extra 10mm when calculating space requirements.
Parallel tracks, straight or curved are naturally spaced a standard distance apart (Approximately 43mm from track centre to track centre). This spacing allows adequate passing clearance between trains under all conditions and is known as ‘Standard Track Centres’. Items such as points and crossings are all designed with these simple rules in mind so that you can create your own junctions knowing that the parts will fit together correctly.
Before finalising your layout, decide where it is convenient to position the power controller(s) for connection to a mains socket.
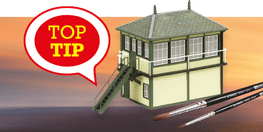
Five key things to remember when building a baseboard:

Prep your space
If you are building a dedicated model railway room, make sure you have prepared the room before installing your layout. Painting the walls and installing power and lighting is much simpler if you do not have to clamber over your layout and it's much safer too.

Choose materials carefully
Some materials work better than others. Plywood with bracing is much easier to use and more suitable than a fibre board or a similar insulation material. Also, remember that you are building a model railway and not a room extension, therefore you do not require 4” x4” (10mm x 10mm) legs to support your layout and for bracing as 2” x 2” (5mm x 5mm) would be fine for a small layout and 2” x 4” (5mm x 10mm) for something larger.

Colour coded wiring
Remember that you do not want to wire your layout more than once, so it is a good idea to colour-code your wiring and use wire which is large enough to do the job adequately. Of course, on a small Hornby TT:120 layout you will be able to either turn the layout on its side or even face down which will make wiring much simpler. Hornby TT:120 has many advantages and being able to have a quite comprehensive layout in a small area is certainly one of them.

Leave access space
It may be tempting to cram as much of your layout into the chosen space as possible, however, remember you will need to have access to not only all parts of the layout for cleaning and putting back derailed trains but also access to windows, doors light fittings and power points. With all this in mind do leave ample space so you can access all areas without having to resort to extreme body twisting.

Relax & enjoy
Finally, remember building and operating a model railway is meant to be a relaxing and pleasant pastime, so if you feel that things are not going to plan, stop and walk away only returning when your mind is clear and you can focus once more.
Take your time and enjoy your Hornby TT:120 adventure
Explore other TT:120 tips


Shop the range
Discover the full Hornby TT:120 range. Don't miss your chance to join the free Hornby TT:120 Digital Club for exclusive members-only benefits.
View the range